Showing posts with label Crafts. Show all posts

Thursday, January 21, 2010

Winter Birthday Bash!


My nephew turned 5 on New Year's Day. We went over for a birthday bash. We tackled a pinata, made a foam snowman picture, went on a treasure hunt, went sledding, threw some snowballs, and made beautiful art in the snow with snow paint. My little guy only went down the hill once sledding, but he made snow art until all of the paint was gone! However, I think that his favorite winter activity is throwing snowballs!

And, I loved the birthday cake too!

Monday, August 25, 2008

Toddler Slippers for My Little Guy!

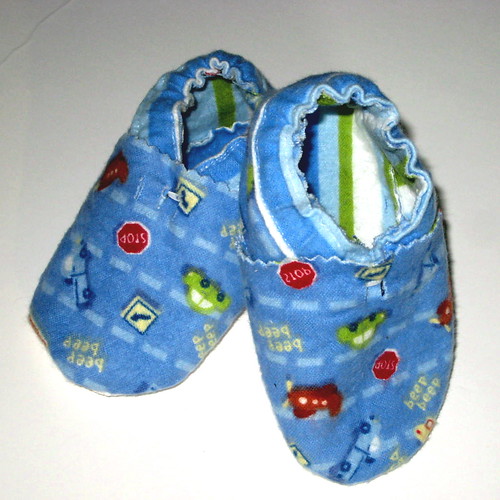
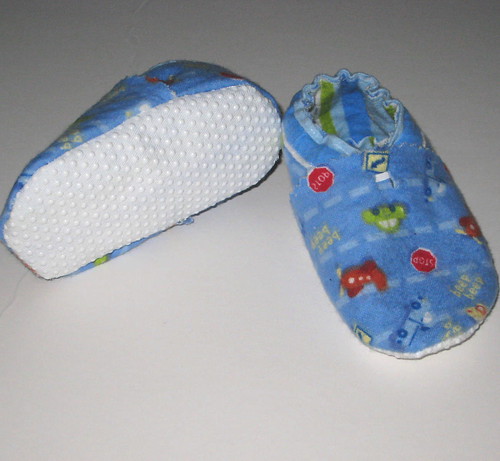
So my little guy's feet are getting bigger and he is now cruising all over the place. It is time for some new shoes. Usually I have just bought him Robeez in the past. This fall we bought him so soft soled sneakers at Stride Rite. Instead of buying more Robeez, I decided to buy some leather at a local fabric shop and make him some leather shoes myself. Since leather is a bit more expensive than cotton, I decided to make him a pair of flannel slippers first. He loves cars and trucks, so I thought that he would enjoy this fabric. The shoes are lined with striped flannel fabric that I had leftover from a quilt I just finished for one of my nephews. I fused all fabric to the liner and then sewed them together. I used no-slip fabric, like the kind on the bottom of sleepers, for the tread. I found this at JoAnn Fabrics. You have to ask for it at the cutting table. I think that they turned out cute for my first attempt at making shoes. They fit him perfectly. I think that I will add 1/4 inch to the design for the leather shoes so that there is a little room to grow. I hope to make the leather shoes soon - I found some very cute leather fabrics!


Thursday, August 14, 2008

Twin Size Quilts for my nephews

I am going back to teaching in a week after spending a year home with my baby boy. One of my goals this summer was to make my older sister's boys twin size quilts, since they just got bunk beds. I found fabric that would appeal to each nephew and used this as the base of each quilt. Each quilt has a simple top and backing. I took a rectangular piece of fabric, 65x44 square inches in dimension and added an 11 inch rectangular borders for a finshed twin bed size of 84"x64". I machine quilted around the construction vehicles for my younger nephew and machine quilted straight lines for the aviation quilt. The photos below show each quilt on a full size bed.


Saturday, June 14, 2008

Math and Sewing

I am a high school math teacher and I love all of the mathematics that is woven into sewing and designing your own patterns. One of my latest sewing creations is a set of fabric blocks. The pattern for a block is simply a mathematical "net" for a 3-dimensional figure. A net is a 2-dimensional representation of a 3-dimensional figure that can be assembled to create the 3-dimensional figure. For a block, which is a cube, there are six sides, so six squares make up the block as shown below.

When sewing, I start by sewing all adjacent sides together. Then, I sew the two sides, and the front and back to the bottom. Finally, I sew the top to each side. For the last edge, I sew only a little ways in from each corner and stop. Next, I turn the block right sides out. At this point, it is time to stuff the block. Finally, sew the opening on the last edge.

Here is a picture of a Jumbo Block that I made for the nursery. Since it is larger, I top stitched each edge to help keep its shape. It is great to double as a pillow for mom or dad after a long night! If you are interested in purchasing this block or one like it, visit my Etsy Shop.

Wednesday, June 11, 2008

Fabric Blocks for my Etsy Shop

My little guy is going through a phase where he throws everything. So, I made him some fabric blocks to play with. Now when I get hit in the head, it won't hurt quite so much! I also made a set for my Etsy Shop. These fabric blocks are made with stimulating patterned cotton fabrics. Machine wash on gentle and air dry. Each block measures approximately 3 inches square.

Tuesday, January 29, 2008

Blueberry Coiled Fabric Basket


Here is my first coiled fabric basket. It measures 8 inches across the top and is 3 inches high. I used the same blueberry fabric as the coasters. For the handles, I looped the coils as I was sewing and then afterwards secured them by hand. Embroidery scissors were just the right tool to use to snip any loose threads after completing the basket.

Saturday, January 26, 2008

Tips for Fabric Coiling - Machine Sewing

  1. Use a Thread Color the same color as your pattern and not the background.
  2. If machine sewing, after tailing off your coil, only cut one thread short. Pull some thread from the spool and then cut with a length of thread attached to your project. Thread through a hand sewing needle. Then hand sew the tail snug and tight to the last coil to help blending in the end point.
  3. Walmart is a good place to find 3/16" fabric clothesline. It is half the price there than at my local hardware store.
  4. In a pinch, the top of a glue stick makes a great substitute for a thimble.

I will be adding to the list as I discover useful tips for fabric coiling.

Books reviews on fabric coiling. I have just bought a second book on fabric coiling. I will review them both books about fabric coiling in my blog once I have had a chance to read the second book.

Thursday, January 24, 2008

Another Coiled Fabric Coaster - Practice Makes Perfect!

So, I made my second coaster today. It was easier the second time. I actually reversed the stitch length and width and like how it came out better. Also, I used blue thread which goes with the pattern instead of the background; so it accents the blueberries well. So, I learned to use a thread color that matches the pattern and not the background. I measured the cording today and figure that one coaster takes about 7.5 feet of length. I think that I will make two more coasters with this fabric to get some more practice before I start the bowls. We'll see ... I really want to make a bowl ;)

Wednesday, January 23, 2008

Coiled Fabric Adventure - My first creation

So, I was going to make a plate for my first coiled fabric project. However, we could really use some baby friendly coasters at my house, so I stopped the coiling at the size of a coaster. I am going to make a few more and experiment with the length and width of my stitch as well. The inner coil is the toughest part to get; so making a few more coasters will give me more practice with that as well. He is a photo of my first coaster.

Monday, January 21, 2008

Coiled Fabric - My latest crafting adventure


My latest interest is fabric coiling. I was in the fabric store this week and saw a book on this topic, It's a Wrap. I knew that this was something that I wanted to try out. So, I bought the book and the necessary materials to get started on my latest crafting adventure. I am currently in the process of wrapping fabric on clothes line. Then the line will be coiled to make plates, bowls, baskets, bags, whatever. Of course I am starting with the most basic, the plate. I hope to make some more progress on it today! Here is what the coiling process looks like. I'll post more pictures when it's done.