Friday, August 22, 2008

Upside Down Tomato Plants - My Dad is so Clever


I recently went to visit my parents in Maine, where I grew up. As I walked around the porch I saw something interesting. Ever since I can remember, my mom has had hanging flowers on the porch. Well, this year, there were tomato plants growing out of the bottom of the hangers. My mom said that they were my Dad's tomato plants. Hence, my dad is so clever. They received a ton of rain this year, which wiped out many of the tomatoes in their garden. However, these upside down tomato plants seemed to weather the storm just fine! I told my parents to expect a blog post about this, because I thought it was very interesting and wanted to share it with my readers.

Thursday, August 21, 2008

No Sew Fabric Crib Rail Guard Tutorial - Now Availble!

One of my friends on Etsy, BareBottomsBoutique, used my quilted crib rail guard tutorial to make a crib rail guard for her son’s nursery. She modified the pattern to fit with the supplies she had on hand. She used fleece instead of quilting batting between two layers of cotton or flannel. She also used snaps, since she did not have buttons on hand. After chatting with her about using fleece, I was inspired to write another tutorial that did not involve sewing. This is an easy project that anyone could complete, even if you have no sewing experience. You only need fleece, basting safety pins, scissors, a measuring tape and about an hour of time. If you make more than one, it will take a bit longer. Pick out your own fabric to match the bedding in your nursery, or a fabric that your babe would love – ducks, bears, frogs, trucks, pink polka dots, etc. This pattern is available in My Etsy Shop.


Please do not copy any part of this post or photos without prior written permission.

Thank you!

Tuesday, August 19, 2008

School's A Hoot Memory Game

Just in time for Back to School! This fun game is educational as it builds deductive reasoning and logic forming skills. There are 14 quilted game pieces, 2 of each picture, and an Owl-School themed Drawstring Bag. Rules for the game are included,but not shown in the photo. Visit my Etsy shop if you would like to purchase this game or see others that are available.

Thursday, August 14, 2008

Twin Size Quilts for my nephews

I am going back to teaching in a week after spending a year home with my baby boy. One of my goals this summer was to make my older sister's boys twin size quilts, since they just got bunk beds. I found fabric that would appeal to each nephew and used this as the base of each quilt. Each quilt has a simple top and backing. I took a rectangular piece of fabric, 65x44 square inches in dimension and added an 11 inch rectangular borders for a finshed twin bed size of 84"x64". I machine quilted around the construction vehicles for my younger nephew and machine quilted straight lines for the aviation quilt. The photos below show each quilt on a full size bed.


Monday, August 11, 2008

Rag Rug - Getting Started


I received a 28 pound box of fabric from a friend on Etsy to make her a rag rug. There is a total of 18 different fabric - not all the same material. I have cotton, polyesters, knit cotton, velor, and one I am not even sure what it is! I have managed to prepare 9 of the 18 fabrics. One is missing from the photo. I fold the fabric and cut it into 1 1/2 inch strips. I am using scissors and eyeballing the measurement, so the width does vary a little. At the ends of each strip, I cut a small slit about 1/2 an inch long. Then, I connect the strips by looping the next strip through itself attached to the ball of "fabric yarn" that I have started. Please visit LauraJane's YouTube Video to see how the "slit" method works for joining the strips of fabric. I have also read about this method in a rag rug pamphlet. If I remember, I will look to see what the pamphlet is called. I still have a bit of work to do and am excited to start the rug. I may make a few hot pads before I begin the room size rug to get a little more practice in. Stay tuned to watch my progress on this project. I will share hints and tips that I discover along the way. For instance, I first joined all the fabric strips and then rolled it into a ball of yarn. For me, I have found it easier to add one strip at a time and roll the ball of yarn as I proceed. The only problem is my son wants to play with the "ball."

Sunday, July 20, 2008

Meow Memory Matching Game

I saw these fabric in the store and know that I wanted to make another game with them. I lve the sweet little kitties and their paw prints. Remember playing memory as a child? This fun game is educational as it builds deductive reasoning and logic forming skills. There are 18 quilted game pieces, 2 of each picture, and a Fun Kitty Drawstring Bag. Visit my Etsy Shop, New England Quilter, to find this game for sale as well as other themed games as well.

Saturday, July 12, 2008

My First Rag Rug

One of the moms in my group, Fabulous Artistic Moms of Etsy, asked if I would make her a rag rug. I had never made one before, but it looked like something fun to try, and I am always up for a challenge, especially if fabric is involved.

When I was a little girl, my twin sister, my older sister and I all went to my grandmother's house after school. My grandmother, who could probably have crocheted in her sleep, taught me how to crochet. It's been a while since I've picked up a hook, but it was like riding a bike, tough to forget. I grabbed some yarn to refresh my memory before starting with fabric. Once I felt comfortable, I grabbed some fabric strips that I had stashed in a box and got to work. I used three different methods of attaching new strips. I wanted to see which I liked the best.

The Vintage Chica has lovely tutorial for crocheting rag rugs. The way she suggests to cut the fabric into strips is what I consider the first method of joining the strips. You simply cut a piece of fabric alternating which side you start from and stopping an inch short of the end each time. The result is a long strip of fabric. However, with this method there are rectangular pieces that stick out a little. She also suggests to tie the fabric strips together when you come to a new piece, but I wasn't sure if I liked the knots showing - I know, they are on the backside.
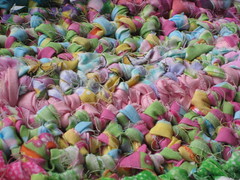
This is a closeup photo of the backside. The green pieces sticking up are the rectangular pieces at the end of the fabric when cutting strips. Then in the middle and at the end, you can see the knots by the pink and blue fabrics. However, you can't see where the fabric changed using the slit method, referenced below.

So, I searched a bit more online. I found LauraJane's YouTube Video on preparing fabric strips. She uses the "slit method." Of the three methods, I liked the look of this one the best. You simply cut small slits in the fabric at the ends and loop a strip into the slit of its own opposite end. See the link for the video. She shows it very well.

Here is a picture of the finished mini rag rug. It was lots of fun to make and I am going to go ahead and make one for my team member.